Wind Calculations: Triangle of Velocities and Flight Procedures
Wind Calculations and Triangle of Velocities
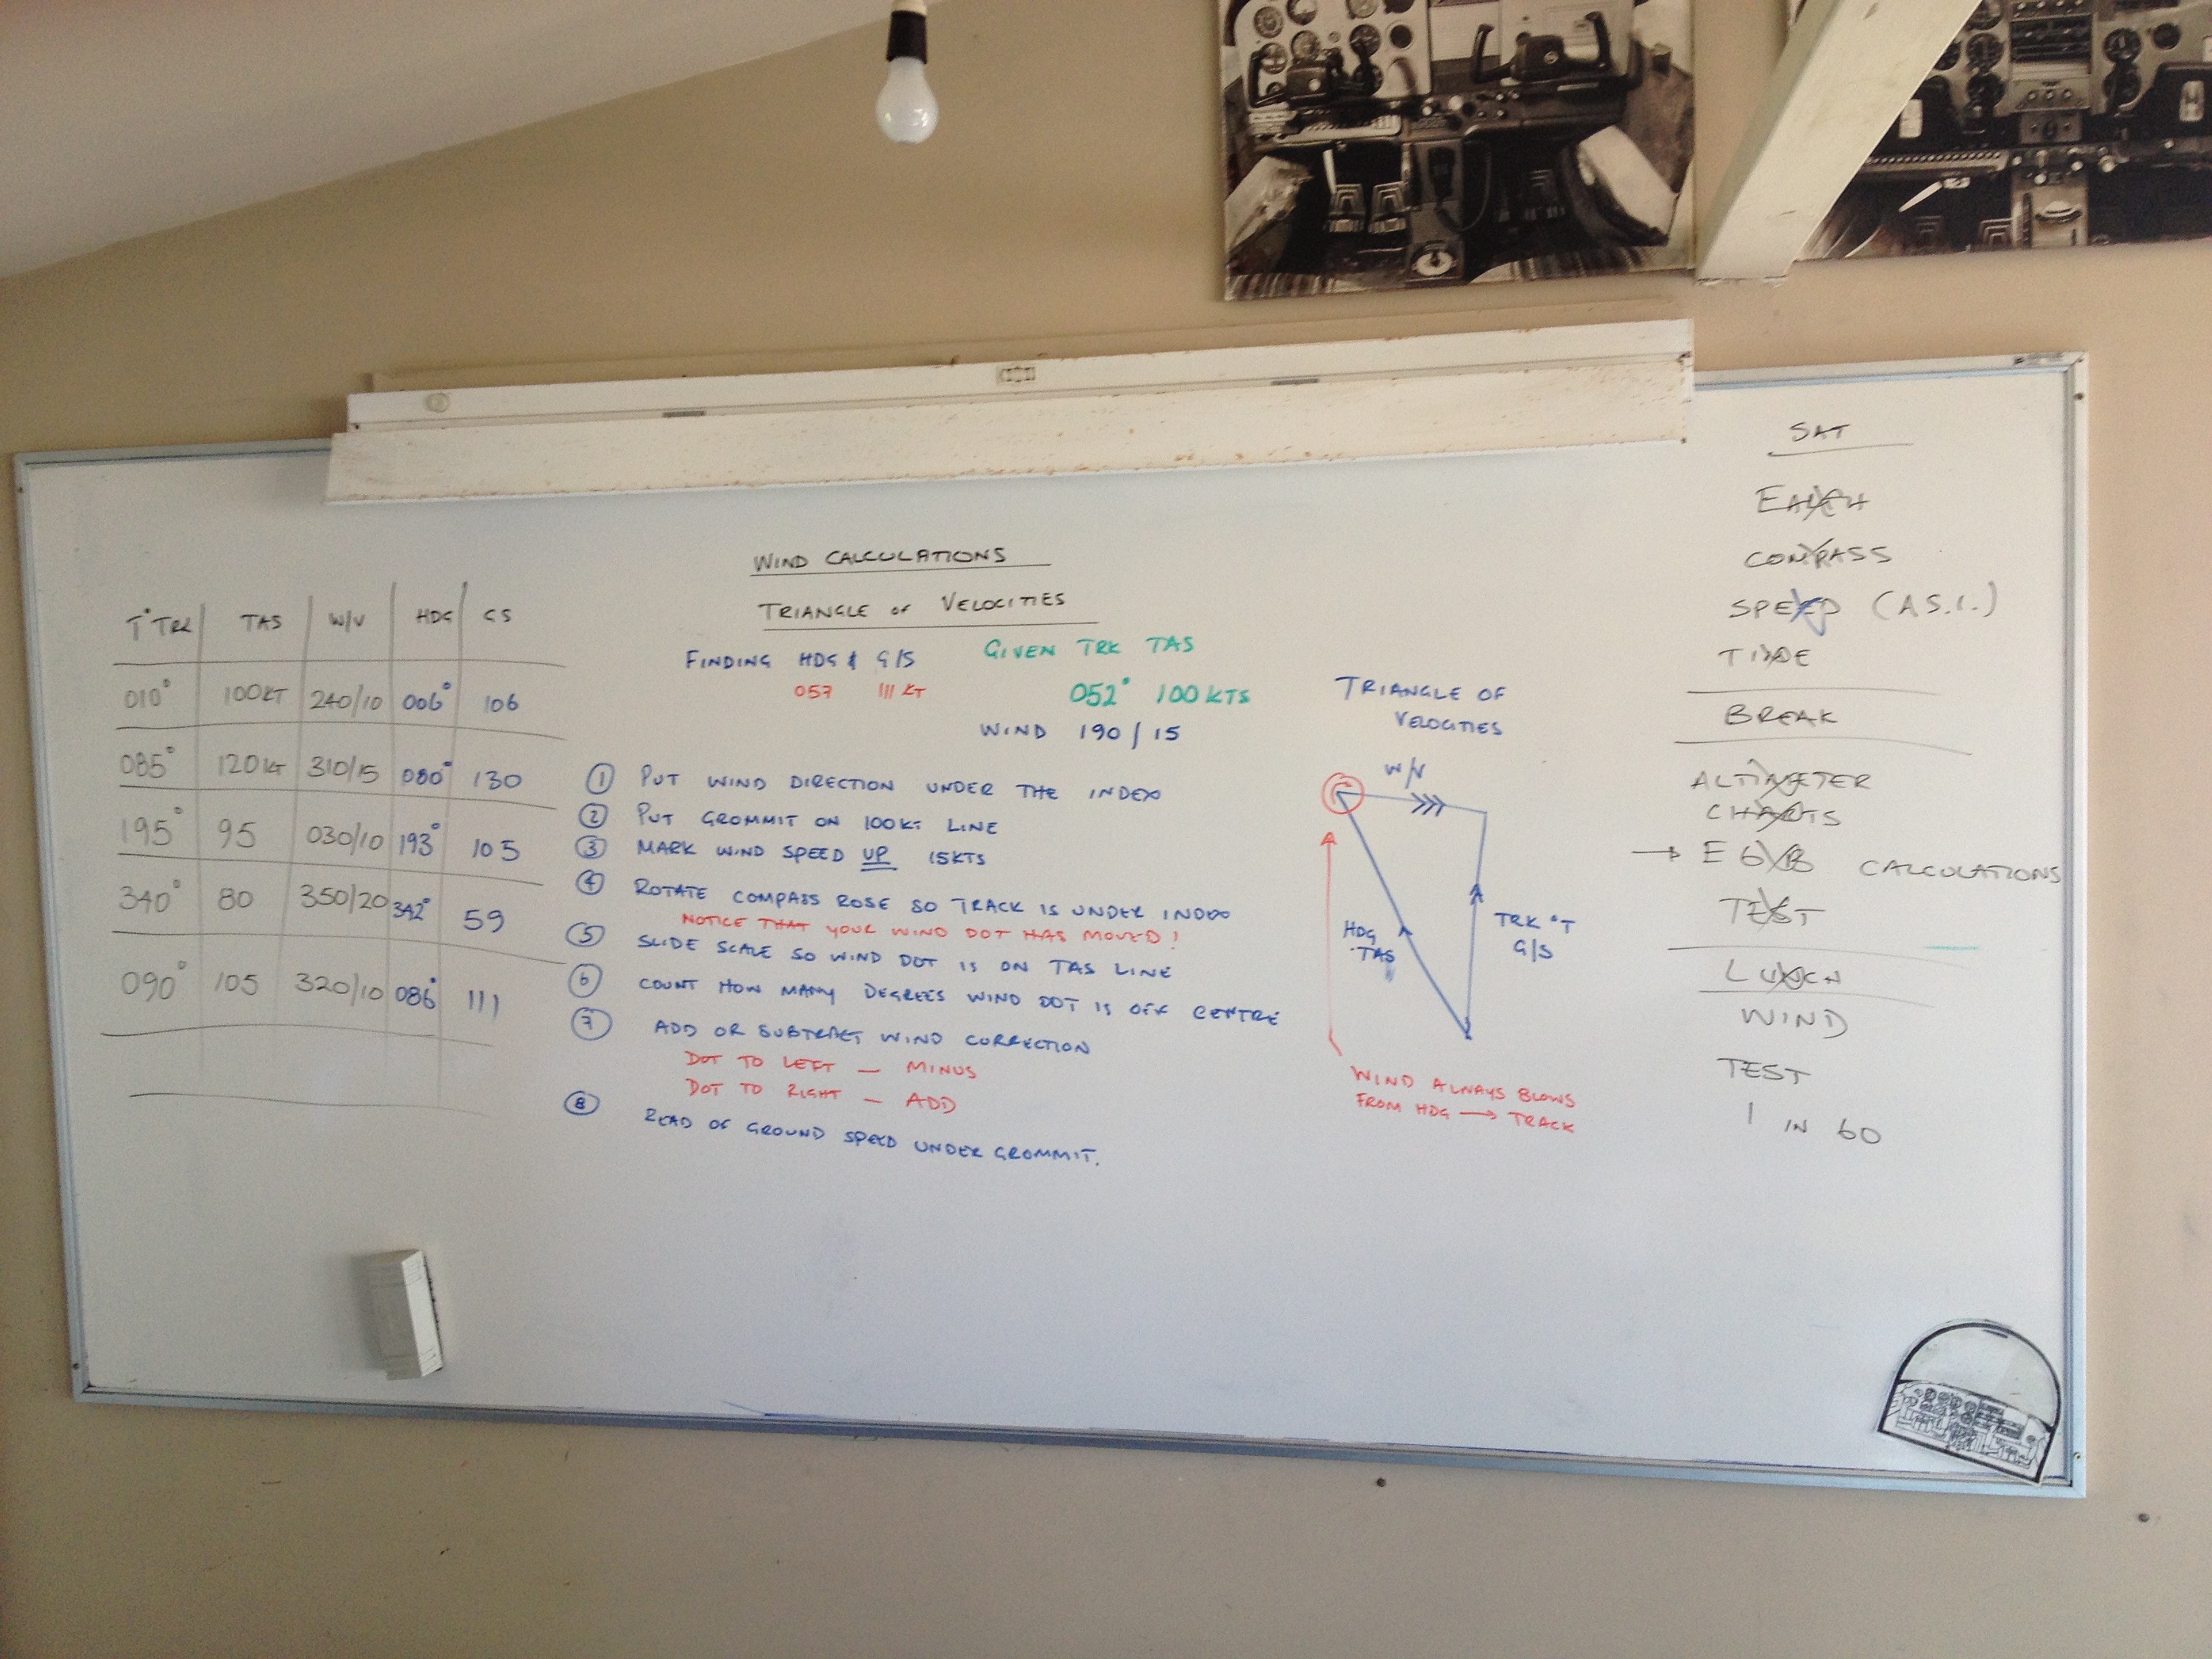
Table of Wind Data
| TRK | TAS | W/D | H/S | CS |
|---|---|---|---|---|
| 010 | 100 | 240 | 106 | 106 |
| 085 | 120 | 310 | 180 | 130 |
| 095 | 130 | 305 | 105 | 105 |
| 340 | 200 | 335 | 59 | 59 |
| 090 | 105 | 320 | 111 | 111 |
Notes on Wind Calculations
-
Finding HDS (Heading Direction Speed) and TAS (True Airspeed)
- The heading direction speed (HDS) helps in understanding the direction and speed at which the wind affects the aircraft's path. Knowing the TAS is crucial for calculating accurate navigation and fuel consumption.
-
Triangle of Velocities
- This is a method used in aviation for understanding how the wind alters the aircraft's path. It uses vectors to represent the relationship among the ground speed, true airspeed, and wind speed.
-
Instructions for Calculating Using the Triangle of Velocities:
- Step 1: Put the wind direction under the airspeed line.
- Thoughts: This helps visually set up the problem. Aligning the wind direction appropriately is crucial for accurate calculations.
- Step 2: Mark wind speed up (as in knots).
- Step 3: Rotate compass rose to track inside.
- Thoughts: This allows for visual representation of how the wind affects the aircraft's track.
- Step 4: Count how many degrees wind differs from true track.
- Step 5: Add or subtract wind correction.
- Dot to the left = Minus
- Dot to the right = Add
- Thoughts: Understanding how to adjust for wind correction is vital for ensuring the accuracy of navigation.
-
Ground Speed Under Correction
- This highlights that the ground speed must be adjusted based on wind conditions to maintain intended flight paths.
Additional Considerations
- The process of adjusting for wind is essential for flight safety and efficiency. In practice, flying experience and real-time adjustments based on conditions are important skills for pilots.
- Using tools like flight computers or software can help simplify these calculations during flight planning and execution.
Reference:
Wind Calculations: Triangle of Velocities
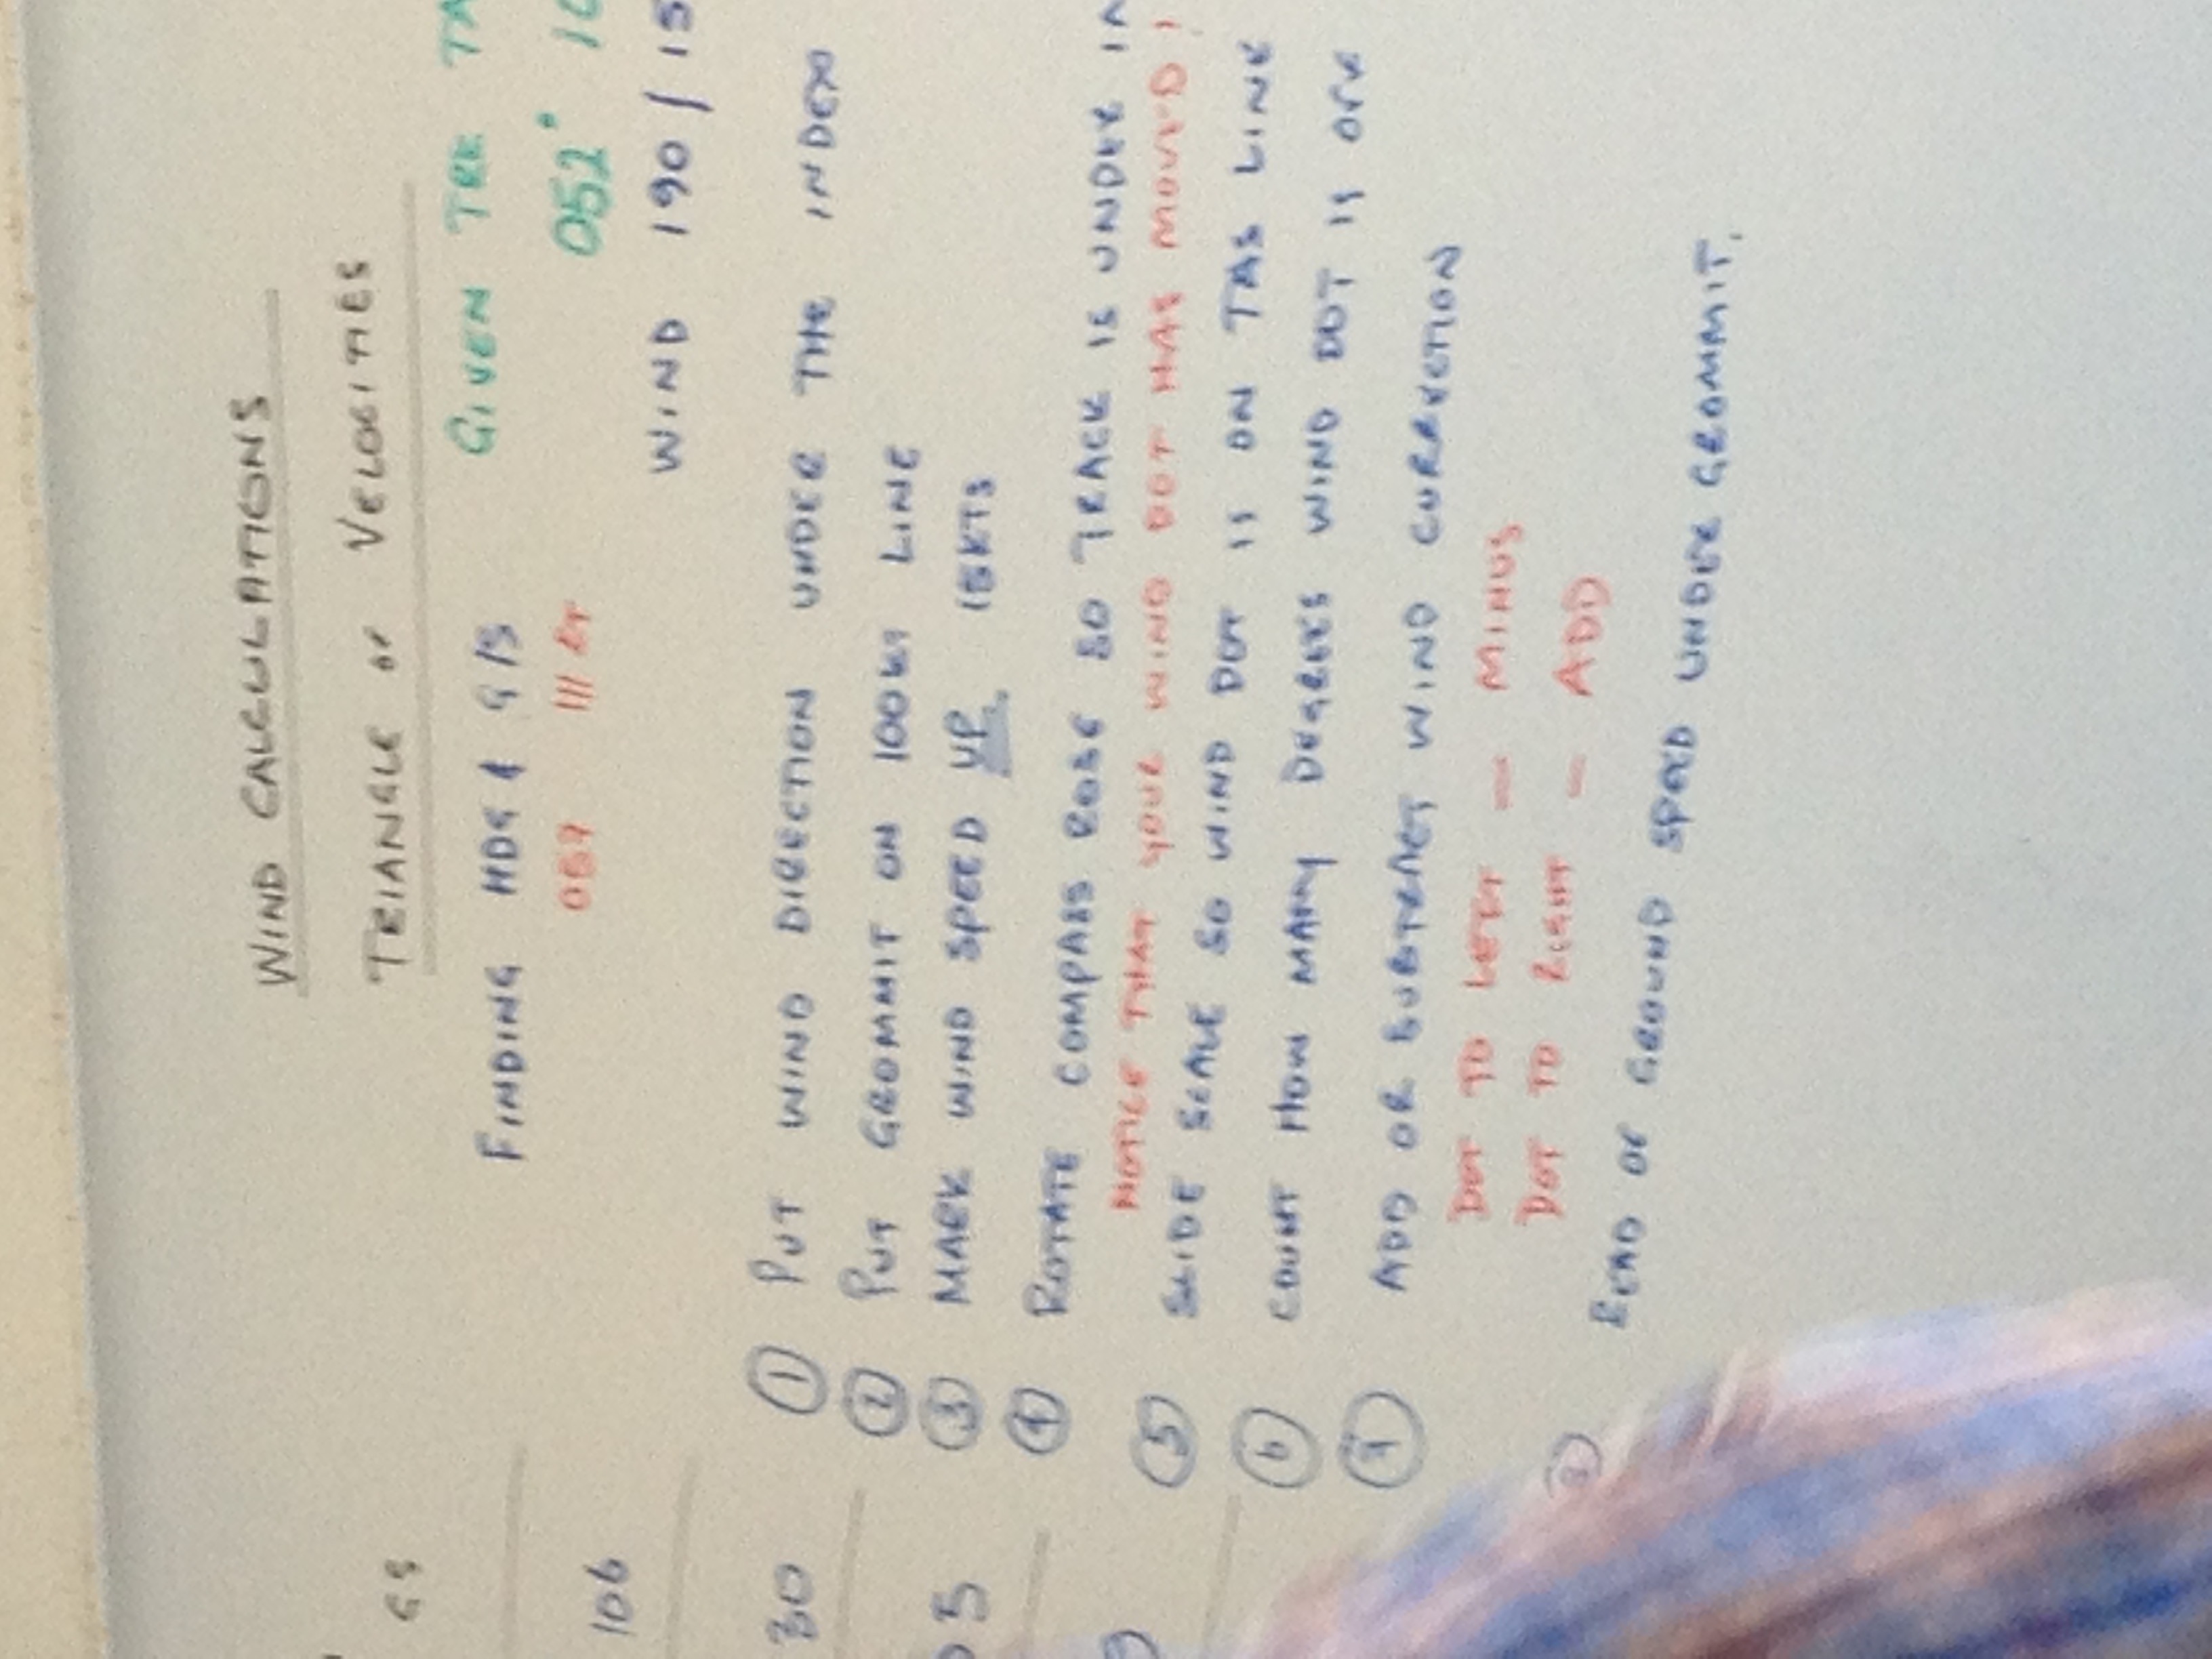
Steps for Finding Heading and Wind Speed
-
Put wind direction under the index
- Thoughts: This is essential for determining how the wind will affect the flight path. Knowing the direction allows for accurate calculations.
- Additional Info: The wind direction should correspond to the compass points (e.g., 0° = North).
-
Put grommet on 100kt line
- Thoughts: This step sets a baseline for the calculations. The grommet represents the aircraft's speed.
- Additional Info: Ensure that the grommet is correctly placed to avoid calculation errors.
-
Mark wind speed up (18kts)
- Thoughts: Adjusting for wind speed is crucial as it impacts the ground speed.
- Additional Info: Wind speed must be considered in both direction and magnitude.
-
Rotate compass rose so tack is under the index
- Thoughts: Aligning the compass properly is important for accurate heading adjustment for wind effects.
- Additional Info: This helps visualize how the wind alters the course.
-
Slide scale so wind dot has moved
- Thoughts: This indicates adaptability in navigation based on wind changes.
- Additional Info: It's vital to note where the wind dot is after movement to inform further modifications.
-
Count how many degrees wind dot is off
- Thoughts: Understanding the angular difference helps in recalibrating the heading.
- Additional Info: This leads to better navigation efficiency.
-
Add or subtract wind correction
- Thoughts: Correcting for wind is paramount to maintain a true course.
- Additional Info:
- Dot to left = Minus
- Dot to right = Add
-
Read off ground speed under grommet
- Thoughts: This gives the final ground speed accounting for wind effects, ensuring the flight plan is accurate.
- Additional Info: Ground speed is critical for time estimation and fuel management.
Summary Table
| Action Number | Action Description | Notes |
|---|---|---|
| 1 | Put wind direction under the index | Essential for determining wind effects on flight path. |
| 2 | Put grommet on 100kt line | Sets a baseline for calculations. |
| 3 | Mark wind speed up (18kts) | Adjusts for wind's impact on ground speed. |
| 4 | Rotate compass rose so tack is under the index | Ensures proper alignment for heading adjustments. |
| 5 | Slide scale so wind dot has moved | Indicates adaptability for changing wind conditions. |
| 6 | Count how many degrees wind dot is off | Importance of recalibrating heading based on wind. |
| 7 | Add or subtract wind correction | Helps maintain true course relative to wind. |
| 8 | Read off ground speed under grommet | Finalizes ground speed after accounting for wind. |
Reference:
Flight Training Notes
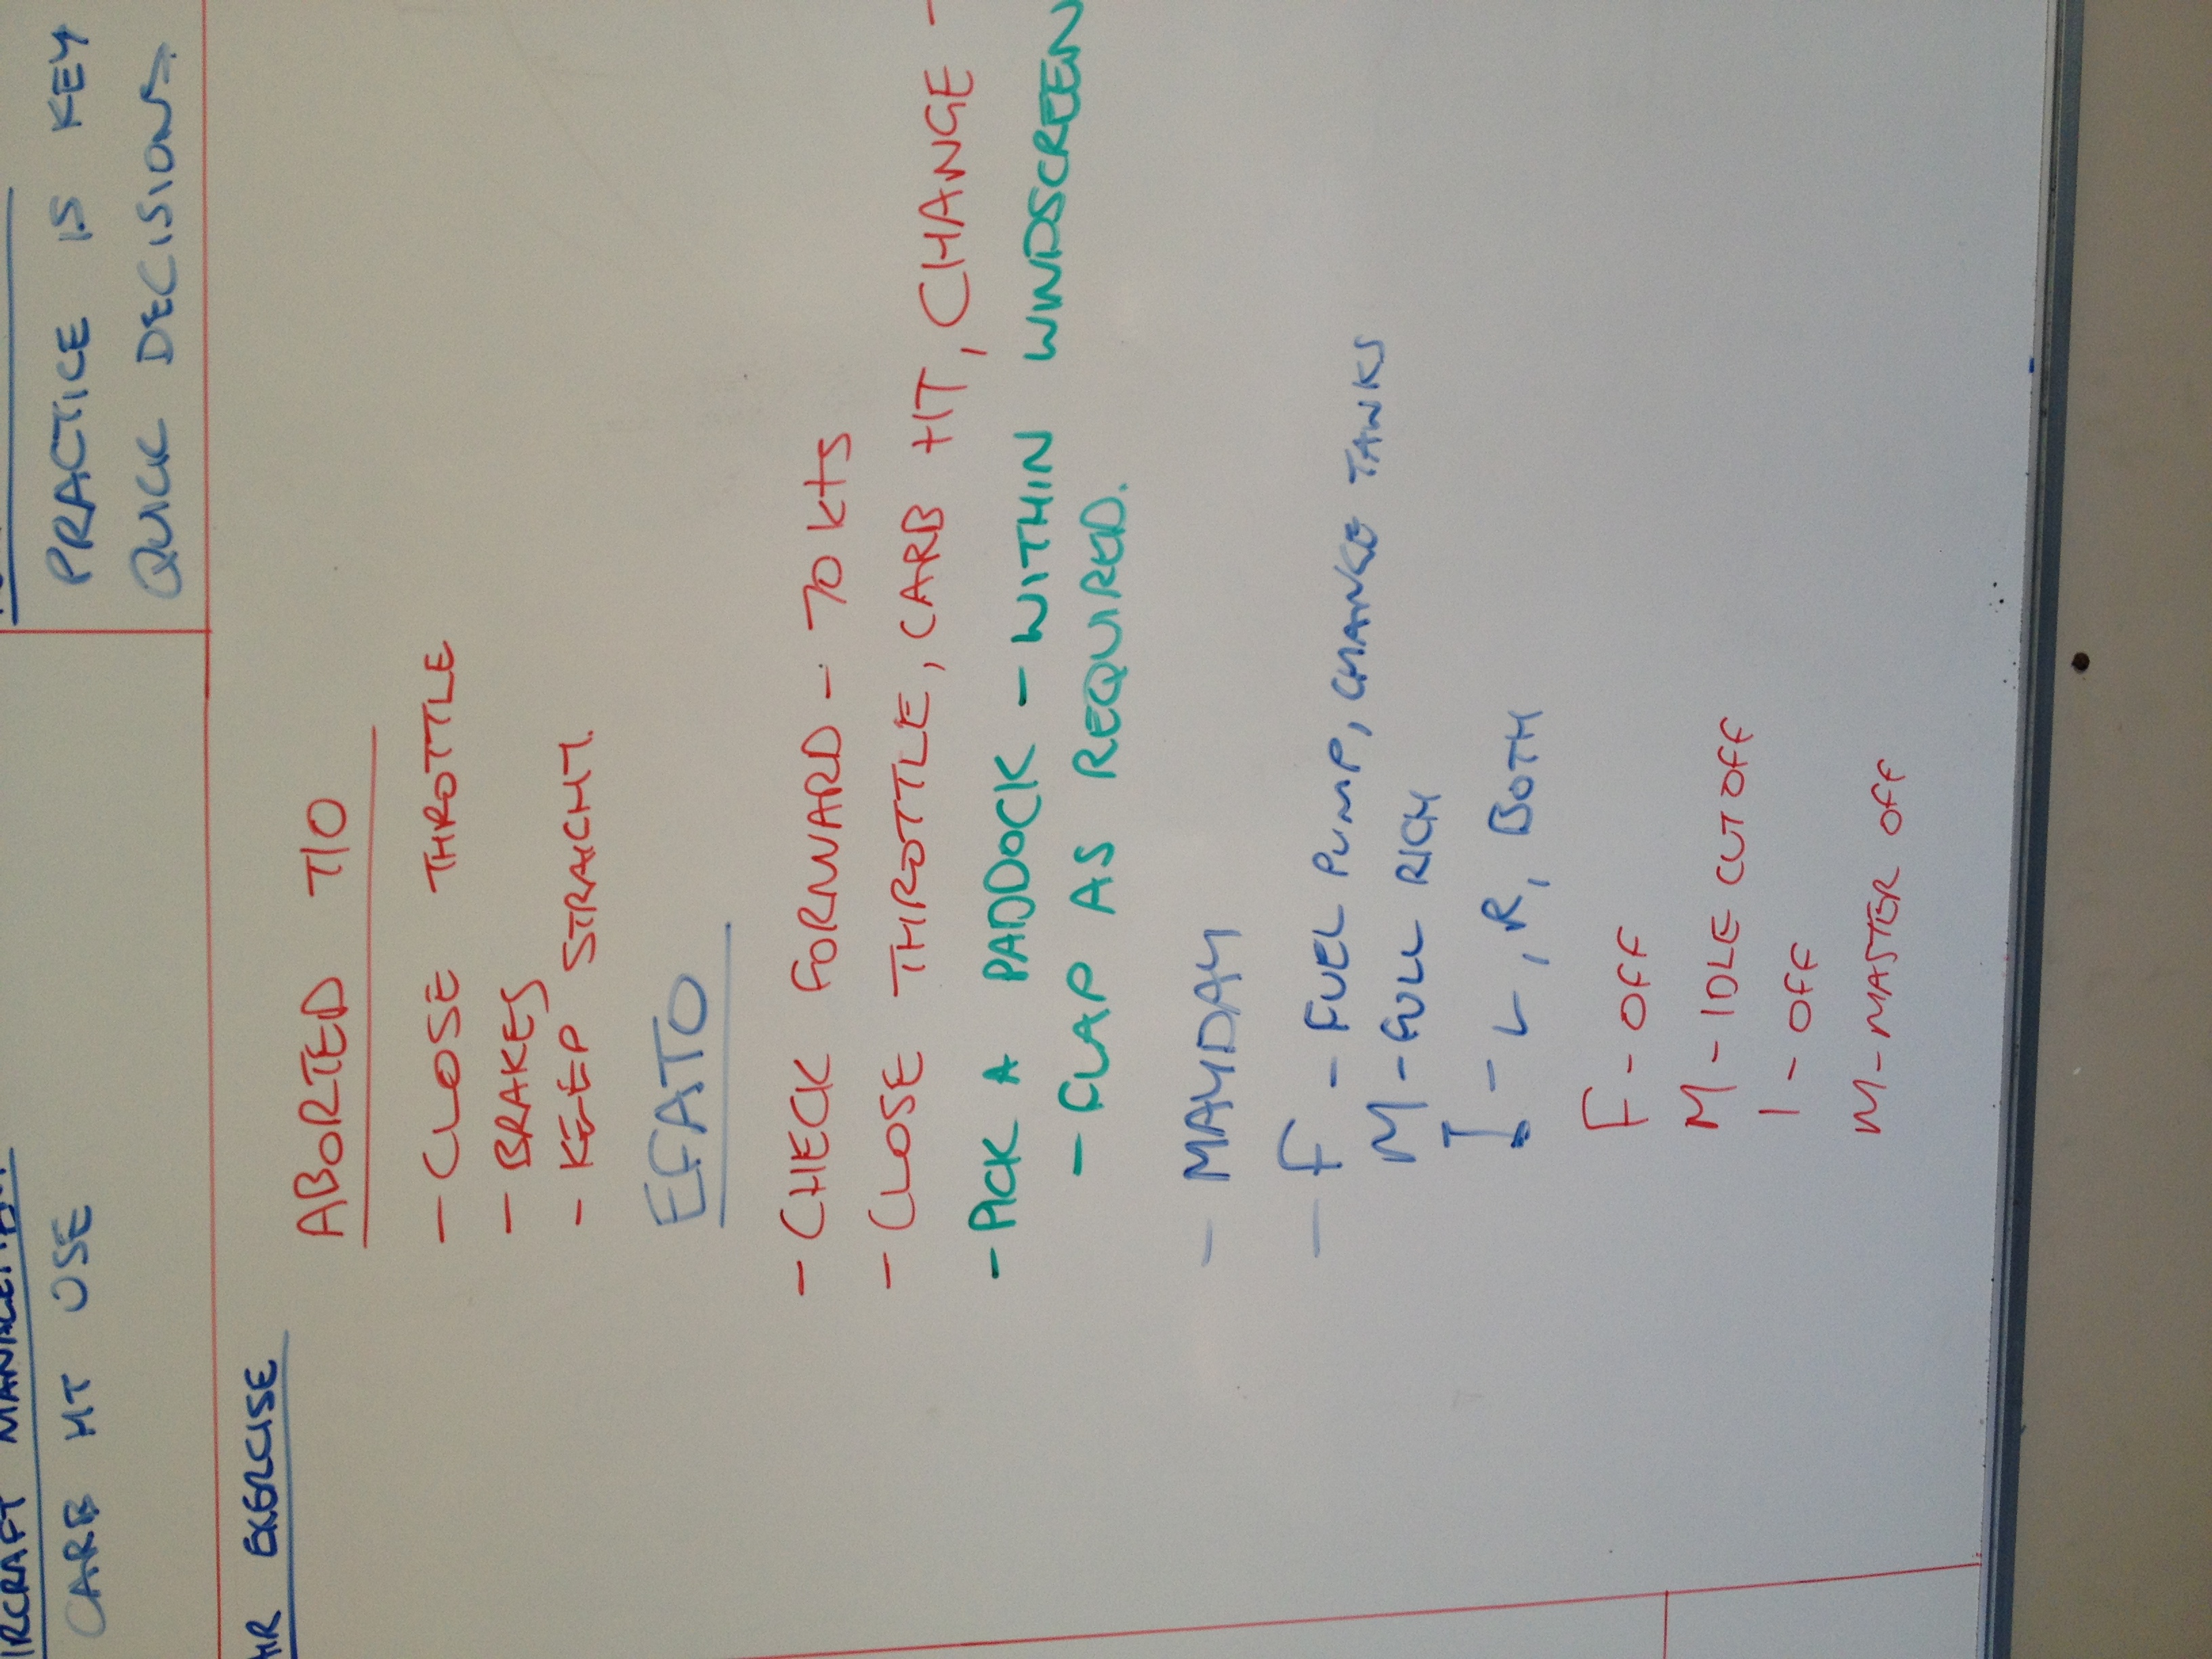
Aborted Takeoff (T/O)
-
Close Throttle
- This is the first immediate action to stop the aircraft's acceleration if an aborted takeoff is required. It halts all power going to the engines.
-
Brakes
- Application of brakes is crucial for stopping the aircraft effectively. Ensuring to apply them firmly but not excessively is important to avoid skidding.
-
Keep Straight
- Maintaining directional control is key to safe stopping. This prevents the aircraft from veering off the runway.
Engine Failure After Takeoff (EFATO)
-
Check Forward - 70 Kts
- At this speed, the aircraft should be ideally positioned for glide and can maintain control while assessing the situation.
-
Close Throttle, Carb Heat, Change
- Actions taken to manage engine failure: closing the throttle helps identify a potential complete loss of power, while carb heat may assist in preventing icing. Adjusting fuel and systems is necessary for safety.
-
Pick a Paddock - Within Windscreen
- Always have an emergency landing spot in mind. This helps to prepare for a controlled landing in case of engine failure.
-
Clap as Required
- In a training environment, signaling by clapping might indicate when students should perform certain actions or checks—clear communication is vital.
Mayday Call Procedures
-
F - Fuel Pump, Change Tanks
- Check fuel systems and switch tanks if the fuel flow appears problematic.
-
M - Full Rich
- Adjust the mixture setting to enrich the fuel-air mixture, which can provide better engine performance in an emergency.
-
I - L, R, Both
- Verify operations of the left, right, or both fuel systems to ensure adequate fuel supply.
Emergency Shutdown Procedure
| Action | Status |
|---|---|
| F | Off |
| M | Idle Cut Off |
| I | Off |
| M | Master Off |
-
F - Off
- Turn off the fuel pump to minimize fire risk.
-
M - Idle Cut Off
- Engaging the idle cut-off to shut off the engine.
-
I - Off
- Confirm that both left and right fuel taps are turned off.
-
M - Master Off
- Finally, ensure the master power switch is turned off to cut all electrical systems for safety.
Reference:
Flight Procedure Notes
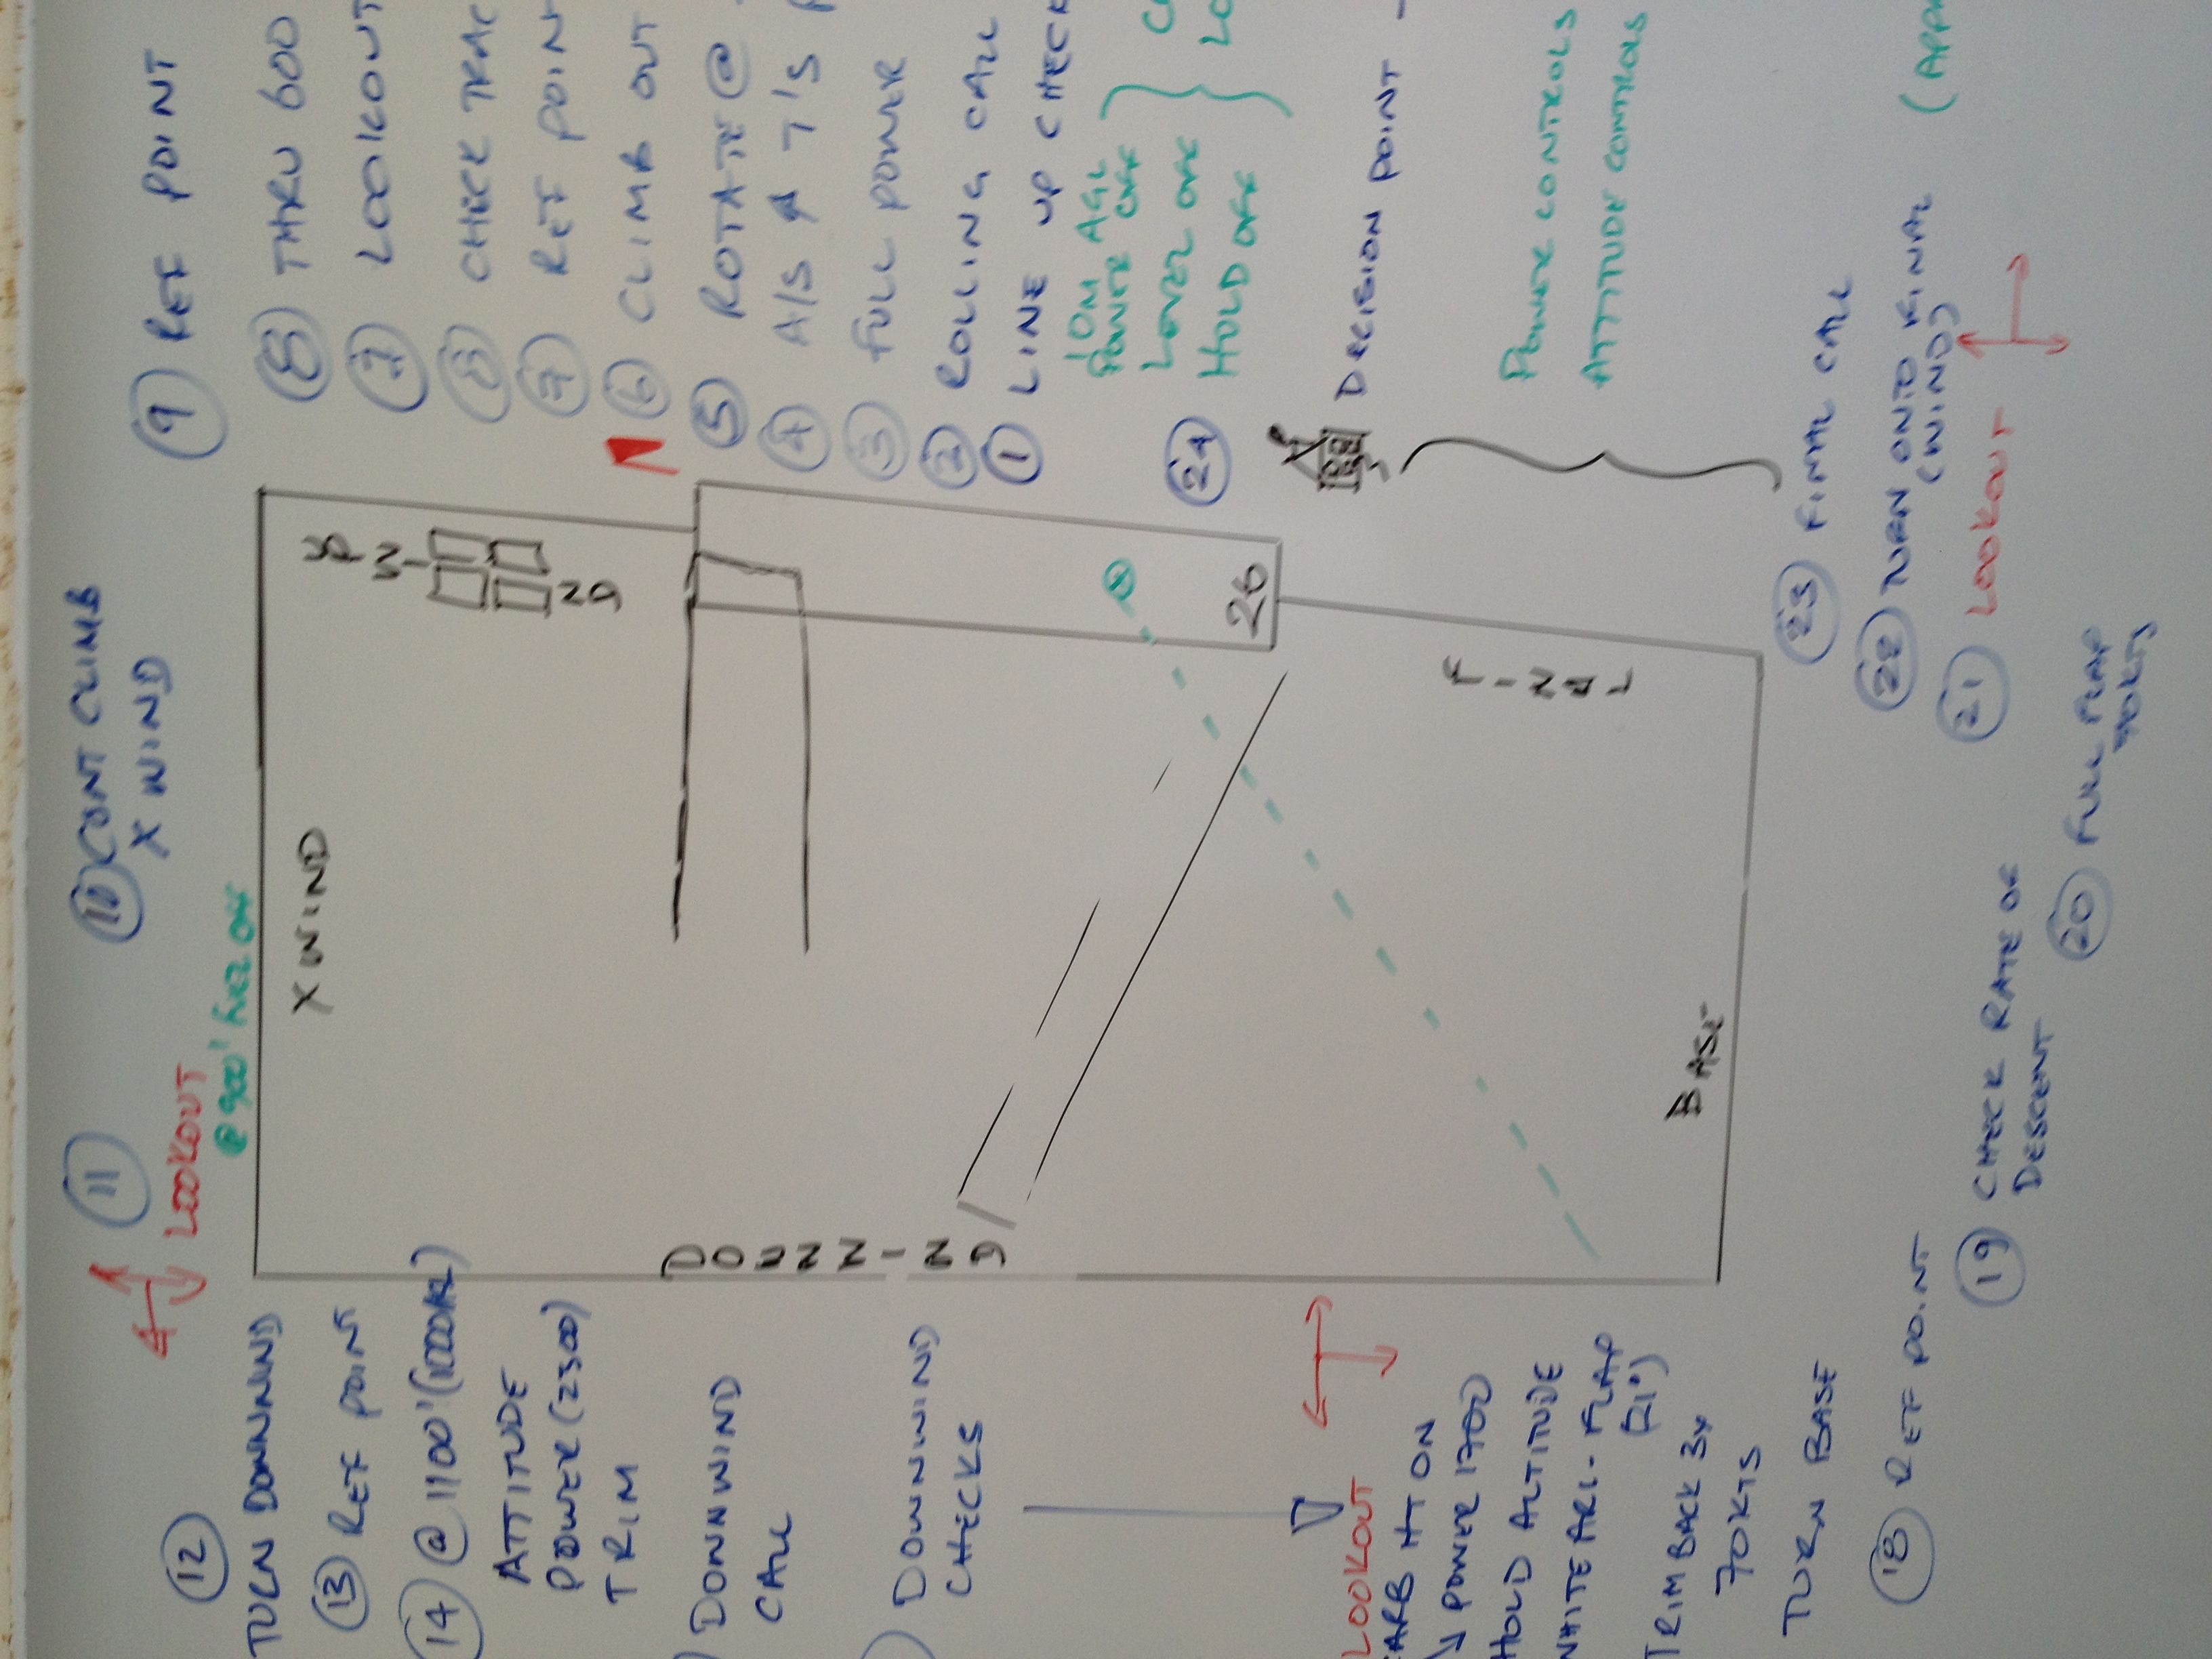
Flight Sequence Overview
- Turn Downwind: Initiate a downwind turn after reaching a specific altitude or reference point. Ensure all systems are functioning appropriately before this maneuver.
- Reference Point: Identify and confirm reference points at various altitudes to maintain situational awareness during the flight. This helps in navigation and aligning the approach.
Detailed Steps
- Check Trajectory: Regularly assess the flight path to ensure it aligns with expected routes and objectives.
- Climb Out: After turn, climb to the designated altitude while constantly monitoring speed and altitude.
- Lookouts: Maintain vigilance in the airspace, particularly through defined lookout procedures.
- Power Settings: Set the engine power to the recommended 2300 RPM for optimal climb performance.
- Downwind Checks: Confirm that all flight controls and instruments are operational before entering the downwind leg.
Important Procedures
- Decision Point: This is critical for determining whether to continue with the landing approach or to execute alternate plans. Evaluate aircraft performance and weather conditions here.
- Final Call: A last assessment of the flight is necessary to ensure safety before final descent.
- Full Flap Setting: Configure flaps to full for landing to increase lift and reduce stall speed.
Summary Table
| Step | Action | Additional Notes |
|---|---|---|
| 1 | Turn Downwind | Initiate after reaching altitude. |
| 2 | Reference Point | Key for navigation; always verify position. |
| 3 | Climb Out | Monitor speed and altitude during ascent. |
| 4 | Lookouts | Critical for collision avoidance throughout flight. |
| 5 | Power Settings | Set to 2300 RPM for optimal performance. |
| 6 | Downwind Checks | Essential for flight safety; confirm all systems. |
| 7 | Decision Point | Evaluate landing options; consider performance factors. |
| 8 | Final Call | Last confirmation before landing approach. |
| 9 | Full Flap Setting | Enhances lift for safe landing; configure as required. |
These notes represent a structured approach to executing a safe flight maneuver and should be internalized for both theoretical knowledge and practical application during flights.
Reference:
Flight Procedure Notes
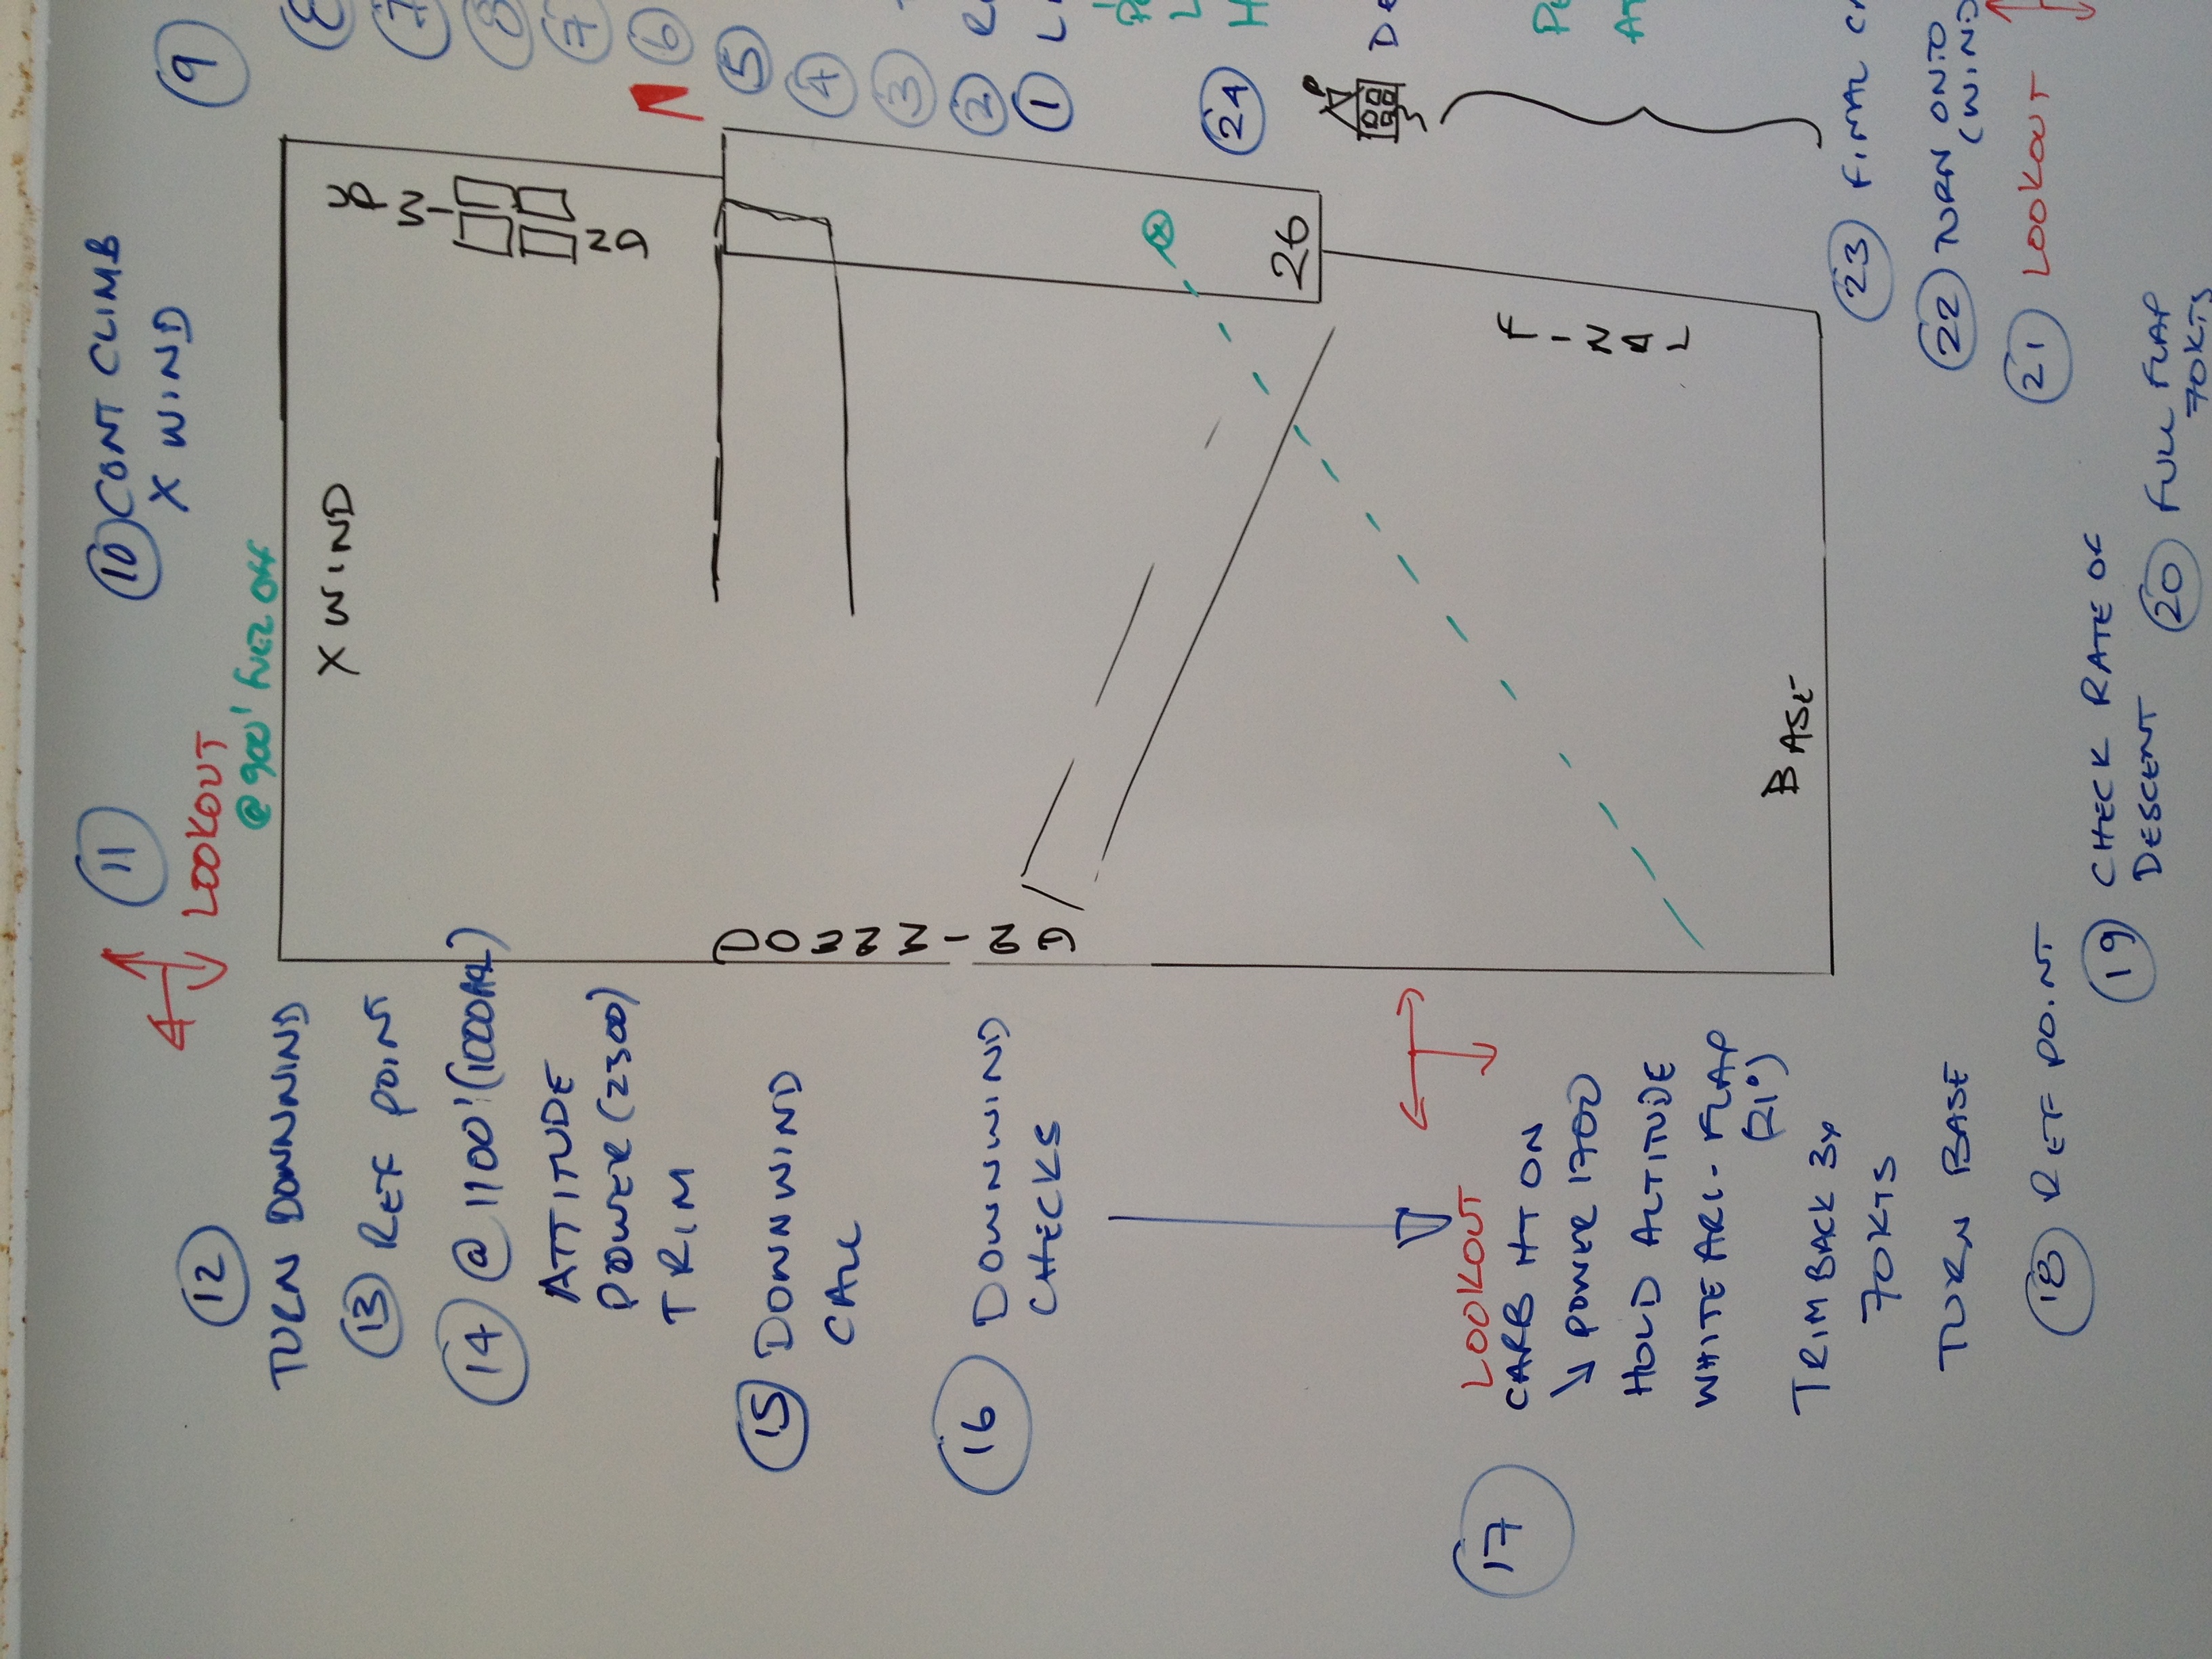
Key Points and Procedures
-
Lookout @ 90° REZ Off
- Always maintain situational awareness when making turns. A lookout helps ensure safety and monitors other air traffic around.
-
Turn Downwind
- A critical step in the approach, ensuring the aircraft is in a position to line up with the runway and facilitates safe landing.
-
Reference Point
- Identify a significant landmark to help gauge your position and distance from the runway. This assists in maintaining correct flight path.
-
At 1100' (1000' AGL)
- Monitor flight parameters:
- Attitude: Ensure the aircraft is level or in a slight descent to maintain proper approach.
- Power: Adjust to 2300 RPM to control descent rate.
- Trim: Set to reduce workload and maintain stable flight.
- Monitor flight parameters:
-
Downwind Call
- Communicate with air traffic control or other pilots to notify intentions and position, ensuring safety and effectiveness in traffic management.
-
Downwind Checks
- Perform systematic checks to verify all systems are functioning correctly before descending further. This includes checking fuel levels and systems status.
-
Carb Heat On
- Activate carburetor heat to prevent ice formation which can cause engine performance issues.
-
Power 1700 RPM
- Reduce power setting to control descent rate while maintaining lift and speed.
-
Hold Altitude
- Maintain a specific altitude to control approach and make later adjustments as necessary.
-
White Arc - Flap (1°)
- Deploy flaps as required to increase lift and control descent rate. Monitoring the flap settings is crucial for stability during landing approaches.
-
Trim Back 3°
- Adjust trim to ease control pressure during descent; aids pilot in maintaining a stable approach.
-
Turn Base
- Transitioning from the downwind to base leg prepares for final approach to the runway. This is where final checks should be conducted.
-
Final Call
- Announce intentions on final approach to maintain clear communication with others in the area.
-
Check Rate of Descent
- Ensure that descent is controlled and within safe limits to avoid any sudden altitude changes.
-
Full Flap 70 KTS
- Extend flaps fully at 70 knots to enhance lift and reduce stall speed, facilitating a safe landing approach.
Flight Path Diagram
| Point | Action/Notes |
|---|---|
| 9 | CONT CLIMB X WIND |
| 10 | Lookout @ 90° REZ Off |
| 12 | Turn Downwind |
| 13 | Reference Point |
| 14 | At 1100' (1000' AGL) - Attitude, Power (2300), Trim |
| 15 | Downwind Call |
| 16 | Downwind Checks |
| 17 | Lookout |
| Carb Heat On, Power 1700 RPM, Hold Altitude, White Arc-Flap (1°) | |
| 18 | Reference Point |
| 19 | Check Rate of Descent |
| 20 | Full Flap 70 KTS |
| 21 | Lookout |
| 22 | Turn onto Final |
| 23 | Final Call |
| 24 | Final Approach |
| 26 | Final Landing Guidance |
These notes collectively provide an overview of the approach and landing process, ensuring that safe and controlled flight operations are maintained throughout the procedure.
Reference:
EFATO Procedures
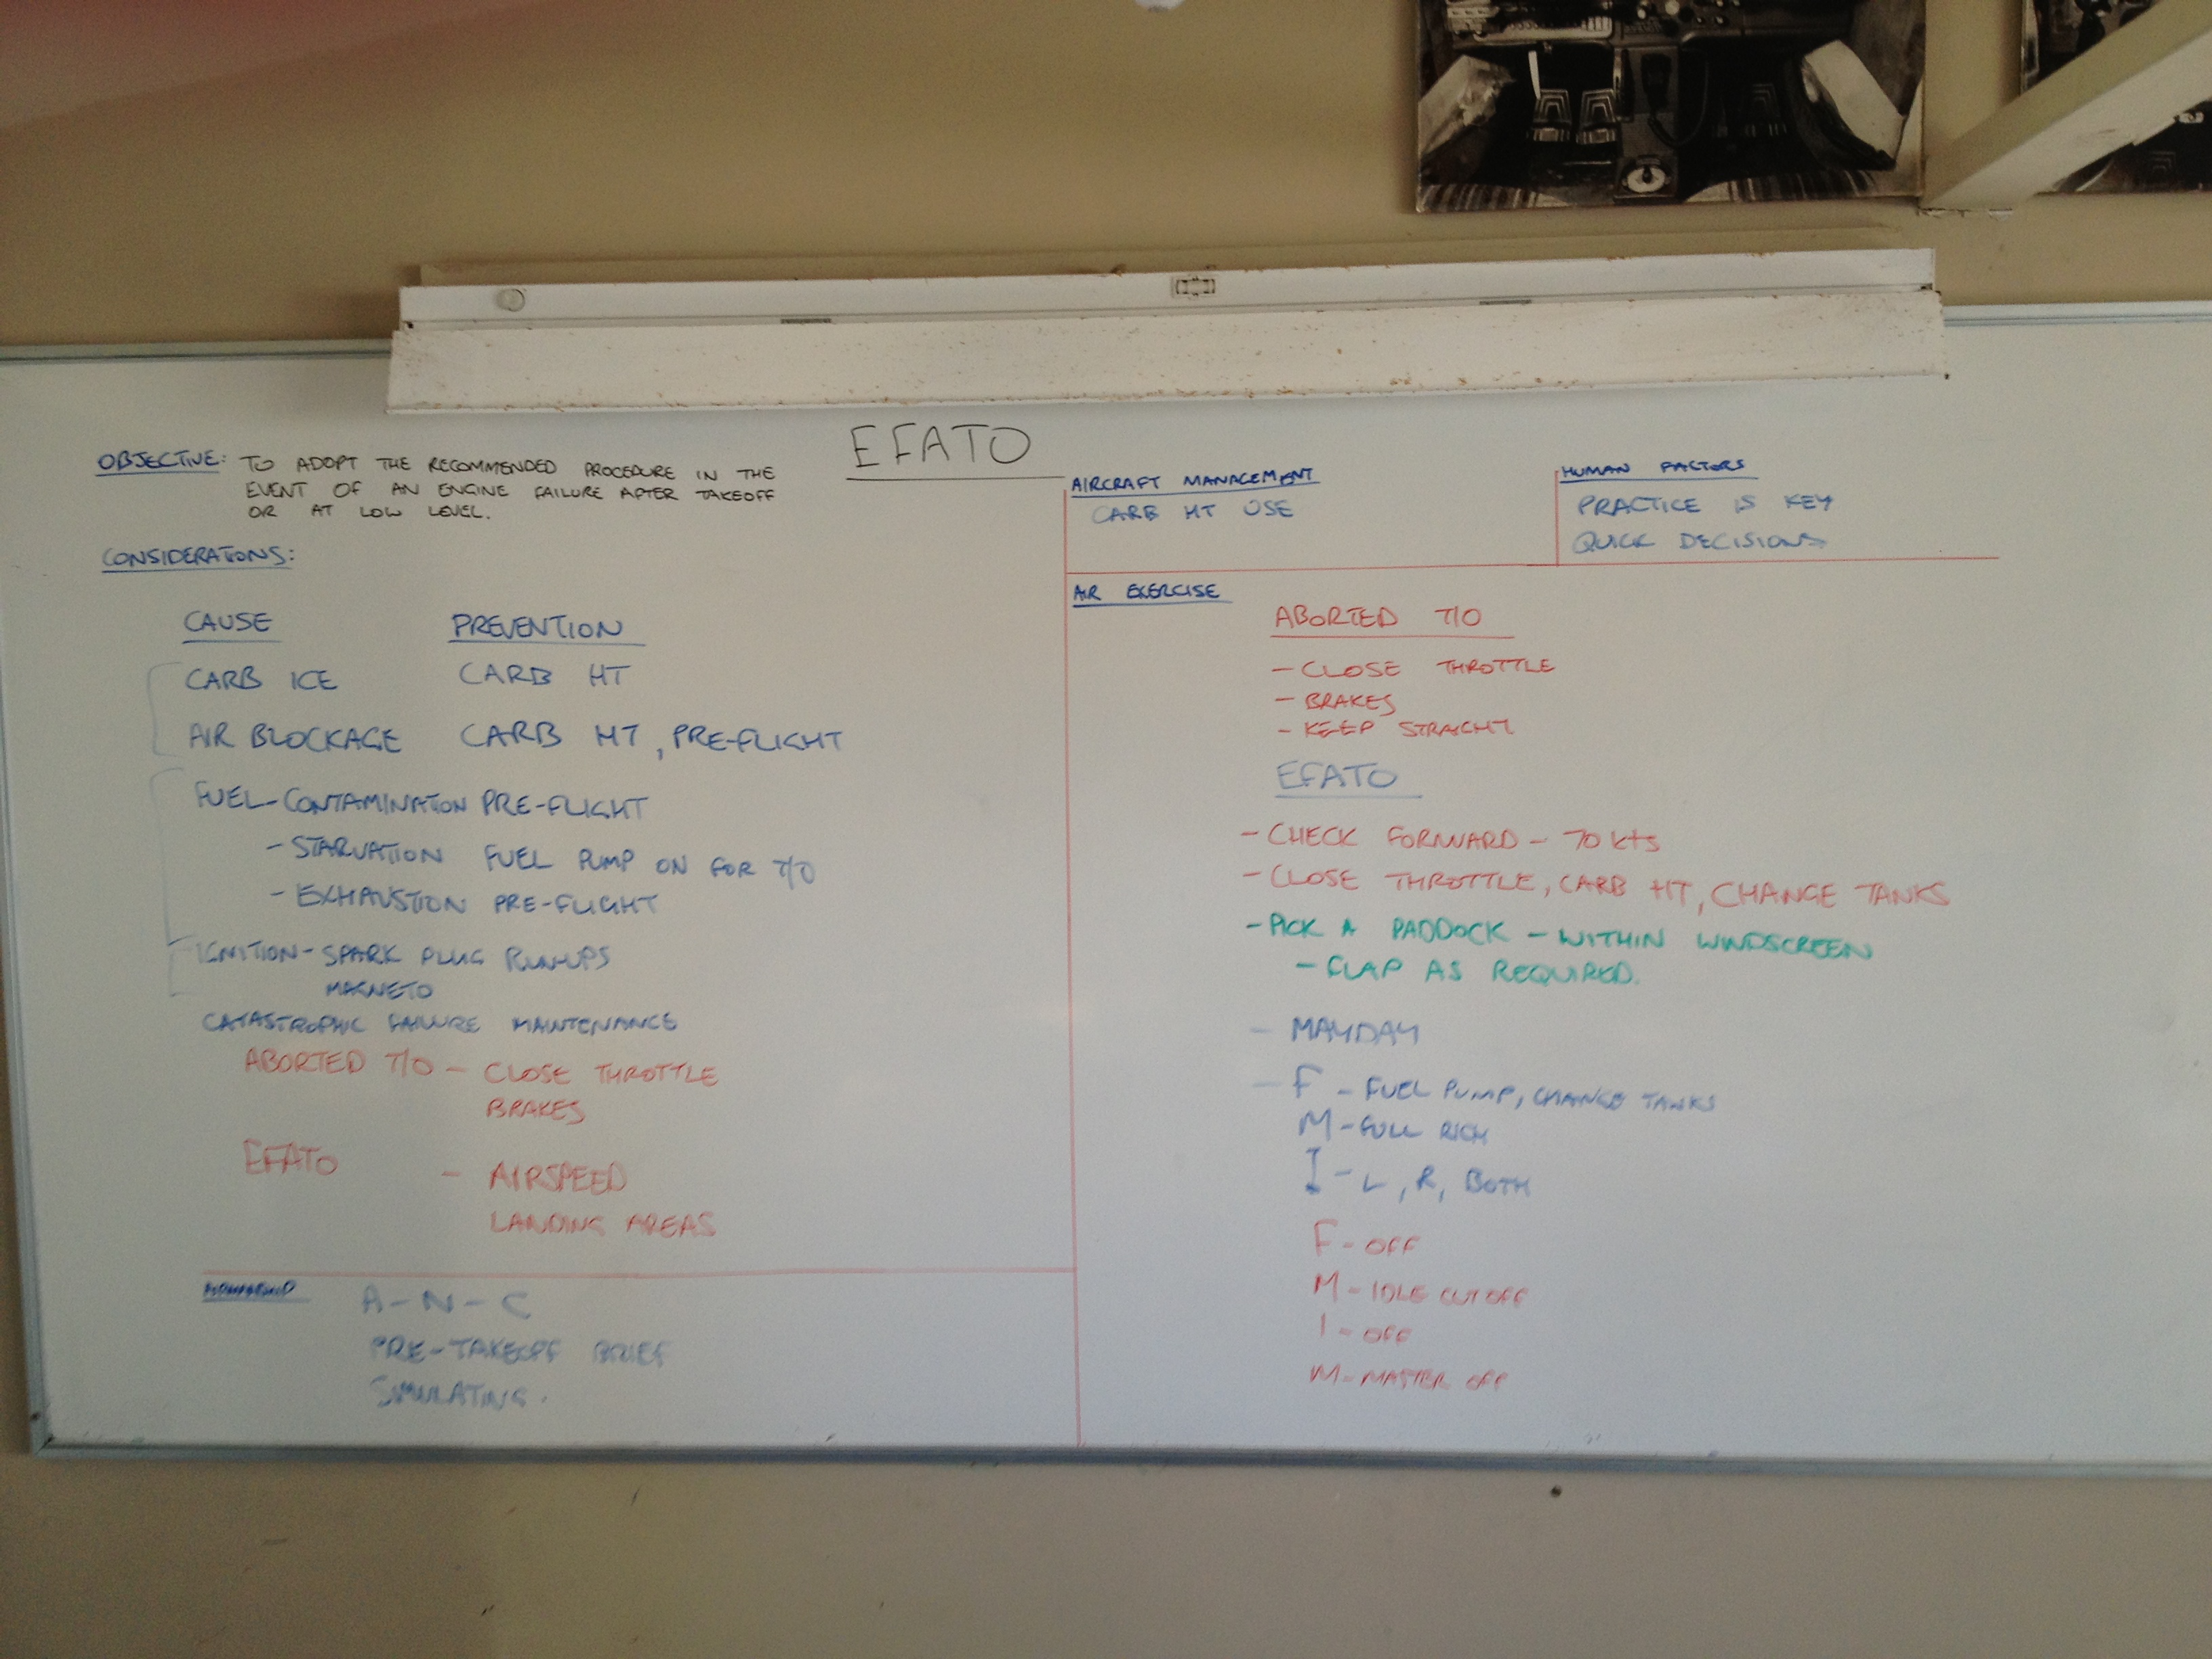
Objective
- To adopt the recommended procedures in the event of an engine failure after takeoff at low level.
Considerations
| Cause | Prevention |
|---|---|
| CARB ICE | CARB HT |
| AIR BLOCKAGE | CARB HT, Pre-flight |
| Fuel contamination pre-flight | Starvation fuel pump on for 70 |
| Exhaustion pre-flight | |
| Ignition - Spark plug ramps | Maintenance for spark plugs |
| Catastrophic failure | Maintenance records |
Notes:
- CARB ICE: Carburetor ice can form in humid conditions; proper management and awareness can help prevent it.
- AIR BLOCKAGE: Ensure all air filters are inspected pre-flight to avoid blockage during critical phases.
- Fuel contamination: Make sure to check fuel quality prior to flights to prevent starvation.
- Ignition maintenance: Regular maintenance is crucial for avoiding ignition failures.
Aborted Takeoff (TTO)
Steps:
- Close throttle
- Apply brakes
- Keep straight
Notes:
- Aborted takeoffs should be a reflex action when anomalies are detected during takeoff.
- Practice these steps regularly to ensure muscle memory during real-life scenarios.
EFATO (Engine Failure After Takeoff)
Steps:
- Check forward to 70 knots.
- Close throttle, carb heat on, change tanks.
- Pick a paddock (clear area) within the windscreen.
- Flap as required.
Notes:
- Airspeed Management: Maintaining the correct airspeed is vital for controlled descents and landings.
- Choosing a paddock: Always have an emergency landing spot in mind before takeoff.
Mayday Procedures
Steps:
- Fuel Pump: Change tanks
- Mixture: Full rich
- Ignition: Off (as required)
- Radio: May need to be turned off
Notes:
- Understanding and practicing these steps can save vital seconds during an emergency.
- Emphasis should be placed on clear communication with ATC during a mayday situation.
Human Factors
- Practice is key.
- Quick decision-making can be a lifesaver in emergencies.
Notes:
- Regular simulation training can help in improving instinctual responses during stressful situations, enhancing overall flight safety.
Reference: