How to Build an Image-to-Text OCR Python App With Streamlit
A Step-by-Step Tutorial on Leveraging OCR Options (Tesseract, EasyOCR, and GPT-4 Vision) and Optimizing for SEO
- Name
- Tison Brokenshire
Updated on

Introduction
Optical Character Recognition (OCR) enables you to extract readable text from images, PDFs, or handwritten notes, making it one of the most in-demand computer vision tasks today. Whether it’s digitizing documents, scanning receipts, or turning screenshots into editable text, OCR has a wide range of applications.
In this tutorial, we’ll walk you through how to build a simple image-to-text OCR app in Python using Streamlit. We’ll also discuss multiple OCR options including Tesseract (opens in a new tab), EasyOCR (opens in a new tab), and emerging LLM-based OCR solutions like GPT-4 Vision.
Feel free to jump to any relevant section:
- Project Overview
- Setting Up Your Environment
- OCR Options Overview
- Implementing OCR with Tesseract
- Implementing OCR with EasyOCR
- Exploring GPT-4 Vision or GPT4-O
- Building the Streamlit App
- Deploying Your App & SEO Tips
- Conclusion
1. Project Overview
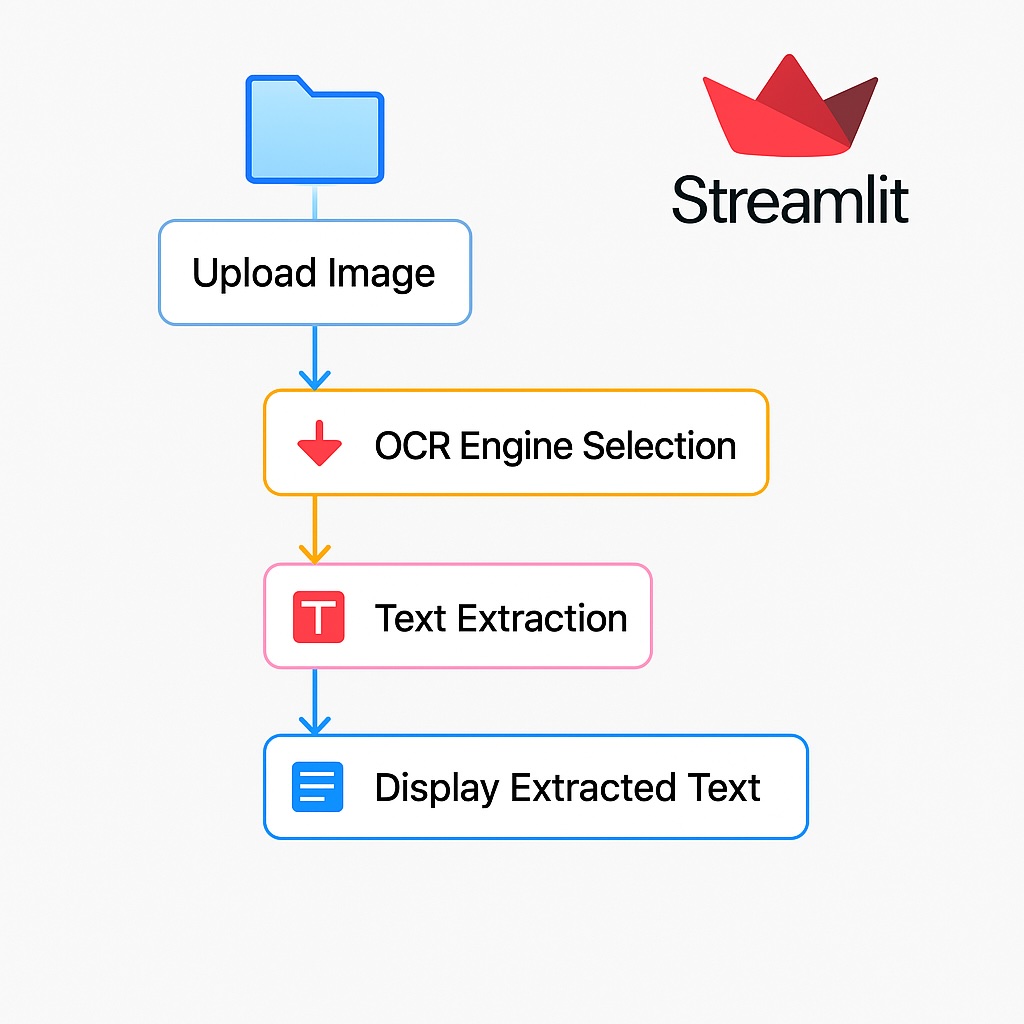
Our final application will allow a user to:
- Upload an image file (such as a .png, .jpg, or .jpeg).
- Perform OCR on the uploaded image.
- Display the extracted text.
We’ll use Streamlit to build a simple and interactive web-based interface. The core OCR functionality can be supplied by Tesseract, EasyOCR, or another advanced approach like GPT-4 Vision (if and when it’s accessible to you).
2. Setting Up Your Environment
Before we dive in, let’s install the needed libraries in a fresh environment.
Prerequisites
- Python 3.7 or above
- Pip or Conda for package management
Installation Steps
# Create a new virtual environment (optional but recommended)
python -m venv venv
source venv/bin/activate  # On Windows: venv\Scripts\activate

# Install Streamlit
pip install streamlit

# OCR libraries
pip install pytesseract  # For Tesseract
pip install easyocr       # For EasyOCR

# If you want to try Google Cloud Vision or other advanced APIs, install google-cloud-vision
# pip install google-cloud-vision

# Additional libraries
pip install pillow # For image processingNote: You will need to install Tesseract (opens in a new tab) on your system if you plan to use it locally. EasyOCR works out-of-the-box once installed via pip.
3. OCR Options Overview
3.1 Tesseract
- Pros: Free, open-source, widely used.
- Cons: Not always the best accuracy on complex images, especially with unusual fonts or lower quality images.
3.2 EasyOCR
- Pros: Simple to set up, supports 80+ languages, often better with complex fonts than Tesseract.
- Cons: Larger library size, can be slower for large deployments.
3.3 GPT-4 Vision or GPT4-O
- Pros: State-of-the-art performance, ability to understand context, can handle complex image scenarios (like identifying text within cluttered backgrounds).
- Cons: Not widely available via a public API at the time of writing; may have usage costs, and real-time or batch usage may be subject to rate limits.
4. Implementing OCR with Tesseract
Let’s first see how you might implement a simple Python function that does OCR with Tesseract.
4.1 Installing Tesseract
- On Ubuntu/Debian:
sudo apt-get install tesseract-ocr - On Windows: Download the installer (opens in a new tab). Remember to note the install path for
pytesseract.
4.2 Sample Code (Tesseract)
import pytesseract
from PIL import Image

# Example path for Tesseract on Windows (adjust accordingly):
# pytesseract.pytesseract.tesseract_cmd = r"C:\Program Files\Tesseract-OCR\tesseract.exe"

def ocr_with_tesseract(image_path):
    """
    Perform OCR on the given image using Tesseract.
    """
    image = Image.open(image_path)
    text = pytesseract.image_to_string(image)
    return text

if __name__ == "__main__":
    text_output = ocr_with_tesseract("sample_image.png")
    print(text_output)
5. Implementing OCR with EasyOCR
If Tesseract doesn’t meet your needs or you want to experiment with a different engine, try EasyOCR:
import easyocr

def ocr_with_easyocr(image_path, lang_list=['en']):
    """
    Perform OCR on the given image using EasyOCR.
    """
    reader = easyocr.Reader(lang_list)  # Initialize with a list of languages
    result = reader.readtext(image_path)
    # EasyOCR returns bounding boxes and text, so let's just combine the text parts
    extracted_text = "\n".join([res[1] for res in result])
    return extracted_text

if __name__ == "__main__":
    text_output = ocr_with_easyocr("sample_image.png")
print(text_output)Tip: You can initialize
easyocr.Reader(['en', 'fr', ...])to work with multiple languages. However, the more languages you add, the more computing resources and time it may require.
6. Exploring GPT-4 Vision or GPT4-O
GPT-4 Vision (or GPT4-O) is an emerging approach that uses large language models capable of image understanding. While it is not universally accessible at the time of writing, here’s the conceptual approach to using LLM-based OCR:
- Upload your image to a GPT-4 Vision-enabled platform.
- Prompt the model with a request like: “Please read all text in this image and provide the extracted text as output.”
- Receive the text output (and possibly additional contextual insights).
If or when GPT-4 Vision becomes publicly available via an API, your code might look like this (hypothetically):
import requests

def ocr_with_gpt4_vision(image_path):
    """
    Hypothetical usage - Example only.
    GPT-4 Vision is currently not widely available via a direct API.
    """
    with open(image_path, 'rb') as f:
        image_data = f.read()

    # Example: sending request to GPT-4 Vision endpoint
    url = "https://api.openai.com/v1/images/ocr"
    headers = {"Authorization": "Bearer YOUR_API_KEY"}
    files = {"image_file": image_data}

    response = requests.post(url, headers=headers, files=files)

    # This is purely hypothetical
    if response.status_code == 200:
        return response.json()["text"]
    else:
raise Exception(f"Error: {response.text}")Note: The above code is a placeholder for demonstration, as GPT-4 Vision does not offer a widely-available direct REST API at the time of writing.
7. Building the Streamlit App
Now we’ll build a Streamlit app that ties it all together. The basic workflow:
- User uploads image via Streamlit’s
file_uploader. - Select OCR engine (Tesseract or EasyOCR) from a dropdown or radio button.
- Run OCR on the uploaded image.
- Display the extracted text.
7.1 Streamlit App Code
Create a file named app.py (or any other name you prefer):
import streamlit as st
from PIL import Image
import pytesseract
import easyocr

# If needed, set the path to Tesseract (on Windows)
# pytesseract.pytesseract.tesseract_cmd = r"C:\Program Files\Tesseract-OCR\tesseract.exe"

def ocr_with_tesseract(image):
    text = pytesseract.image_to_string(image)
    return text

def ocr_with_easyocr(image, lang_list=['en']):
    reader = easyocr.Reader(lang_list)
    # Streamlit's uploaded file is in-memory, so we can just pass that to PIL
    # But EasyOCR expects a file path OR raw data
    result = reader.readtext(image, detail=0)
    # detail=0 returns just the text
    return "\n".join(result)

def main():
    st.title("Image to Text OCR App")

    st.write("Select an OCR engine:")
    ocr_engine = st.radio("OCR Engine", ("Tesseract", "EasyOCR"))

    uploaded_file = st.file_uploader("Upload an Image", type=["png", "jpg", "jpeg"])

    if uploaded_file is not None:
        image = Image.open(uploaded_file)
        st.image(image, caption="Uploaded Image", use_column_width=True)

        if st.button("Extract Text"):
            with st.spinner("Performing OCR..."):
                if ocr_engine == "Tesseract":
                    extracted_text = ocr_with_tesseract(image)
                else:
                    extracted_text = ocr_with_easyocr(uploaded_file, lang_list=['en'])

            st.success("OCR Complete!")
            st.text_area("Extracted Text", value=extracted_text, height=200)

if __name__ == "__main__":
    main()
7.2 Running the App
streamlit run app.pyPoint your browser to the local URL that appears (usually http://localhost:8501 (opens in a new tab)).
8. Deploying Your App & SEO Tips
8.1 Deployment Options
- Streamlit Cloud: Easiest way; free tier allows you to host small apps.
- Heroku: Container-based platform; you’d need a
requirements.txtand aProcfile. - AWS, Azure, GCP: For larger-scale deployments. You can use Docker containers or directly push to services like AWS Elastic Beanstalk or Google App Engine.
8.2 SEO Tips for Your OCR Tutorial/App
- Include relevant keywords: Terms like “OCR app in Python,” “Streamlit OCR tutorial,” “Image to text tool,” “Tesseract vs EasyOCR”.
- Write descriptive headers and subheaders: Search engines give weight to headings (H1, H2, H3). We used them here to structure the content.
- Add images and alt tags: Show screenshots of your app in action. Use alt tags for accessibility and SEO.
- Provide code snippets and explanations: Technical tutorials often rank higher when well-structured with code.
- Link to external, authoritative sources: For example, Tesseract docs, EasyOCR GitHub, official GPT-4 documentation, etc.
- Use a friendly, shareable URL: e.g.,
mysite.com/blog/python-ocr-streamlit-tutorial. - Frequently update: Keep your tutorial current with new OCR engines, GPT-4 Vision updates, and Streamlit features.
9. Conclusion
You now have a fully functional Image-to-Text OCR application in Python using Streamlit. We’ve also explored multiple OCR solutions—from classical open-source Tesseract to EasyOCR and even the potential of LLM-based OCR like GPT-4 Vision.
Feel free to customize the interface, enhance language detection, or integrate advanced ML-based OCR solutions. By following the SEO tips above, you can also ensure that your tutorial or project page is discoverable by developers and hobbyists alike.
Happy Coding!
Further Reading & References
- Tesseract Documentation (opens in a new tab)
- EasyOCR GitHub Repository (opens in a new tab)
- Streamlit Documentation (opens in a new tab)
- Google Cloud Vision OCR (opens in a new tab)
- OpenAI GPT-4 Info (opens in a new tab) (for future vision-based features)
If you found this guide helpful, feel free to share, bookmark, or give it a star on your favorite platform. Good luck building your next OCR app!
Turn photos to notes and knowledge base
Pixno is your AI note taking assistant that turn photos, audio, docs into well structured text notes and create your personal knowledge base.
Get Started